How to Fill in Photoshop Using AI?
Photoshop has long been a powerhouse in the realm of digital design, providing a multitude of features that cater to both novice and professional users. Among its standout tools, the Fill Tool has been enhanced to transform the way we edit and create.
This article will explore what Photoshop is, delve into the fundamentals of AI, and explain how the Fill Tool functions to save time, improve accuracy, and expand creative options. Join us as we break down its features, benefits, and tips for maximizing the potential of this innovative tool!
Contents
- Key Takeaways:
- What is Photoshop?
- What is AI?
- What is the Fill Tool in Photoshop?
- What is the AI-Powered Fill Tool in Photoshop?
- What are the Benefits of Using AI in the Fill Tool?
- How to Use the AI-Powered Fill Tool in Photoshop?
- What are Some Tips for Using the AI-Powered Fill Tool?
- Frequently Asked Questions
Key Takeaways:
What is Photoshop?
Photoshop is a powerful image editing software developed by Adobe, and it has become the industry standard for digital art and photo manipulation since its launch.
Integrated into Creative Cloud, Photoshop offers a wide range of visual editing tools that allow users to enhance images, create composites, and apply artistic effects using layers, adjustment layers, and various editing tools.
As part of the Adobe Creative Suite, it features a user-friendly interface that caters to both beginners and professionals, revolutionizing the way digital images are created and edited.
What are the Main Features of Photoshop?
Photoshop offers a wide array of features that enable advanced image editing and digital artistry. The program includes numerous editing tools, such as the Lasso tool and Rectangular Marquee, along with various painting tools that facilitate precise selection and manipulation of images and visual elements.
Essential features like layers and blending modes allow users to seamlessly blend visual elements together. Additionally, AI-driven features play a significant role in the image editing process by providing machine learning-generated suggestions and adjustments.
The layered approach is crucial for creating composite images, as it enables artists to move individual elements of the composition without disrupting the overall balance. Adjustment layers are particularly important, as they allow for non-destructive edits that can be revisited and modified at any time.
Revolutionary AI features, such as the Generative Fill function, give the power to users to enhance their imagery by generating content that matches the existing style, adding both realism and creative elements. Together, these features transform basic photographs into sophisticated artistic works, making the program suitable for both novice and expert creators alike.
What is AI?
Artificial Intelligence (AI) refers to the simulation of human intelligence processes by computer systems, enabling machines to learn from data, recognize patterns, and make decisions.
In the digital domain of images, AI encompasses the machine learning algorithms and techniques that analyze and generate content, significantly enhancing the creative processes of image editing and production.
These AI techniques enable users to produce generative content, transforming rough sketches into high-quality, realistic images. Additionally, AI is utilized to automate repetitive tasks, thereby optimizing the overall creative workflow.
How Does AI Work in Photoshop?
AI in Photoshop operates through sophisticated algorithms that analyze image data, assisting users with various editing tasks and enhancing both efficiency and accuracy. One of the most notable AI features is Generative Fill, which leverages machine learning to generate realistic image content based on user prompts. This functionality allows for the seamless removal of objects or the addition of new elements to existing images.
Such enhancement tools revolutionize the creative workflow by providing suggestions for adjustments and automating tedious tasks, enabling users to concentrate on their creative vision.
Along with Generative Fill, Photoshop s AI capabilities include features such as Object Selection and Neural Filters, which streamline the process of isolating subjects or applying complex effects. For instance, the Object Selection tool intelligently detects and selects elements within an image, making it a game changer for both professionals working on high-stakes projects and amateurs looking to enhance their personal photos.
By minimizing the manual effort required for selections, users can achieve pristine results in less time. The use of AI not only fosters creativity but also democratizes image editing, making powerful tools accessible to users of all skill levels and ultimately elevating the overall editing experience.
What is the Fill Tool in Photoshop?
The Fill Tool in Photoshop allows users to fill selected areas of an image with solid colors, patterns, or gradients. This versatile tool enhances the creative potential of digital art by enabling the application of colors to individual layers or adjustment layers.
Users can quickly fill layers or parts of layers with solid colors, patterns, or textures, making it essential for tasks such as applying backgrounds, modifying elements within an image, or creating textures.
How Does the Fill Tool Work?
The Fill Tool in Photoshop is utilized to apply color or patterns to images. It is important to note that the Fill Tool is only effective after making a selection using other tools, such as the Lasso tool or the Rectangular Marquee. These selections define the areas of the image where users want to apply fills.
Similar to other tools, once the area has been selected, the Fill Tool can be found under the Edit menu. Users can then choose the Fill Type whether it be color, pattern, or gradient specify any desired blending modes or opacities, and apply the fill to the selected area or the entire image.
This tool is particularly beneficial for artists who need to change the color of a specific section of their artwork, create new hues, or add textures like wood grain to their existing pieces. Such adjustments enable artists to manipulate their work to achieve the desired effect and enhance their skills.
What is the AI-Powered Fill Tool in Photoshop?
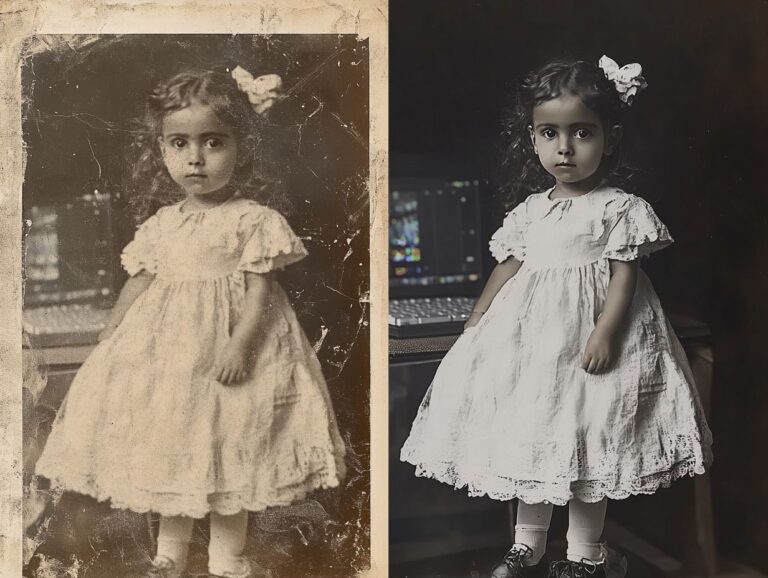
The AI-Powered Fill Tool in Photoshop is a groundbreaking feature that employs advanced algorithms to generate content for digital images, seamlessly blending it with the existing elements of the image. By leveraging artificial intelligence and machine learning, the tool analyzes surrounding pixels, enabling users to remove unwanted objects or fill specific areas with realistic textures and details.
One of the tool’s standout features is its Generative Fill capability, which encourages users to create stunning visuals that align with their creative vision while significantly reducing the time and effort required in the process.
How Does the AI-Powered Fill Tool Work?
The AI-Powered Fill Tool requires users to first make an image selection using the Lasso tool or the Rectangular Marquee before invoking the AI to fill the selection based on context. Once the selection is made, users can access the AI-Powered Fill options, where they can set prompts to guide the algorithm in generating the content.
This results in a highly customizable tool that adapts to the user’s specific editing needs and style. Not only does this enhance the editing experience, but it also ensures that the generated content integrates seamlessly with the existing elements of the image.
After making a selection, users can refine their prompts by specifying requirements for style, colors, or themes, which the underlying machine learning models interpret to produce realistic outputs. These models, trained on extensive datasets, utilize deep learning techniques to recognize and reproduce artistic patterns, ensuring that the filled content is not merely random but is contextually appropriate and aesthetically pleasing.
What are the Benefits of Using AI in the Fill Tool?
The use of AI in the Fill Tool offers several advantages, including simplified image editing, accelerated editing processes, and enhanced options for artistic expression.
By automating repetitive tasks, AI speeds up the editing workflow, allowing artists to concentrate on their creative vision. Additionally, the precision of AI-assisted enhancements ensures that the generated content seamlessly integrates with existing elements, providing artists with greater opportunities for expression without the need for extensive manual adjustments.
1. Saves Time
One of the primary benefits of AI in the Fill Tool is its time-saving feature, which enables users to accelerate their workflows and complete tasks more efficiently. By automating processes such as object removal and background generation, the AI-Powered Fill Tool significantly reduces the time spent on manual adjustments and complex image editing tasks.
This increased efficiency allows artists to devote more time to their creative vision rather than tedious editing work. For instance, a graphic designer working on a marketing campaign can utilize the Fill Tool to swiftly remove unwanted objects from a photo and seamlessly fill in the background a task that would have previously taken hours of meticulous effort.
Similarly, photographers can leverage AI-powered features to effortlessly remove subjects from their surroundings; the tool can instantly generate realistic fills or backgrounds, streamlining the entire process. Users report that they can complete projects ahead of schedule, enabling them to take on more clients or explore other creative endeavors.
This makes the integration of AI into Photoshop a necessity, rather than a luxury, for today s workflows.
2. Improves Accuracy
AI enhances the accuracy of image editing processes within the Fill Tool, ensuring that the generated content seamlessly integrates with its surroundings. The tool employs machine learning algorithms to analyze surrounding pixels and contextual cues, resulting in outcomes that maintain an appropriate artistic fidelity to the original image.
This level of accuracy is crucial when removing objects or filling gaps in images, as it minimizes the need for extensive manual adjustments. For instance, in fashion photography, where the background must complement the model’s outfit, even minor inaccuracies can be distracting. The Fill Tool addresses this by creating backgrounds that are visually harmonious.
Similarly, in product photography, where brand image is paramount, the AI’s accuracy ensures that any replaced or removed items closely resemble their original versions. Whether repairing a damaged photo or retouching an image for social media, the AI-Powered Fill Tool provides artists and marketers with a valuable resource that saves time and enhances visual appeal by delivering reliable and contextually appropriate results.
3. Provides More Options
The integration of AI in the Fill Tool offers users an expanded array of creative options, allowing them to explore new artistic possibilities beyond traditional methods. With customizable prompts and content generation capabilities, the AI-Powered Fill Tool enables artists to experiment with various styles and elements, resulting in unique and imaginative outcomes that align with their creative vision.
This versatility encourages experimentation and fosters innovation in digital art. The importance of customization cannot be overstated, as it transforms the artistic process into a more personal and fulfilling journey.
For example, users can choose specific colors, textures, or themes that resonate with their artistic intent, yielding tailored results that may be challenging to achieve manually. The ability to adjust and refine generated content provides unprecedented flexibility, facilitating on-the-fly modifications an invaluable feature for achieving the perfect composition.
Whether creating intricate landscapes or stylized portraits, individuals can push the boundaries of their creativity, unlocking innovative image-editing results that reflect their unique touch.
How to Use the AI-Powered Fill Tool in Photoshop?
The procedure for using the AI-Powered Fill Tool in Photoshop is as follows:
- Select the Area: Utilize the Lasso tool, Rectangular Marquee, or other selection tools to define the area of the image that requires filling.
- Open the AI-Powered Fill Tool: Navigate to Edit > AI-Powered Fill Tool or select it from the toolbar shortcut menu.
- Adjust Settings: Fine-tune the settings of the AI-Powered Fill Tool to achieve the desired outcome.
- Apply Fill: Click ‘OK’ to apply the fill, and the AI will generate new content based on your selection and the surrounding area.
1. Select the Area to be Filled
To use the AI-Powered Fill Tool in Photoshop, the first step is to create an image selection using tools such as the Lasso tool or the Rectangular Marquee. This selection allows you to precisely determine the part of the image that you want to alter. This step is crucial, as it defines the specific area where the fill will be applied, enabling focused changes without affecting the rest of the image.
A well-executed selection can enhance the overall quality of your edit, so it is important to make careful choices at this stage.
To use the Lasso tool effectively, it is helpful to zoom in on the image; this allows for smoother curves and more accurate edges. For selecting areas with straight edges, the Rectangular Marquee tool is more effective. Simply click and drag across the desired area to select a rectangular section.
However, selecting the wrong area or creating jagged edges can be common challenges. To improve your selections, hold down the Shift and Alt keys (or Shift and Option keys for Mac users).
Additionally, the ‘Select and Mask’ feature offers extra tools for smoothing and refining edges, resulting in a cleaner selection overall.
2. Choose the AI-Powered Fill Tool
Next, choose the AI-Powered Fill Tool from the Edit menu in Photoshop. Once you make this selection, you will see parameters that allow you to customize the fill, utilizing AI features to provide a more context-aware result.
3. Adjust the Settings
The settings of the AI-Powered Fill Tool offer customization options that grant users greater control over the fill process. These settings may include various fill types and blending options, as well as prompts that assist the AI in content generation. This allows users to tailor the results to align with their artistic intentions and visions. Properly adjusting these settings can significantly enhance the quality and effectiveness of the fill applied to an image.
Users can select from multiple fill types, including patterns, gradients, or solid colors, each providing different effects that suit various artistic styles. Additionally, blending options can be modified to ensure a seamless integration with the existing image, facilitating a more gradual transition between the fill and the original image elements.
Moreover, users can adjust the strength and opacity of the fill, offering another parameter for experimentation. User prompts can also be crafted to guide the AI in capturing specific themes or emotions, resulting in outputs that are not only visually appealing but also conceptually fitting for the project.
4. Click ‘OK’ to Apply the Fill
After adjusting the settings to your satisfaction, the final step in using the AI fill is to click “OK” to apply the fill. Once you do this, the AI will make adjustments based on your selections and inputs, initiating the content generation process. During this process, the AI will evaluate the selected area and fill it with content that matches the existing image to achieve the desired result.
Users will notice that the automatically generated adjustments blend the newly created elements with the surrounding pixels, enhancing the overall image. However, it is important to proceed with caution; once the fill is applied, some adjustments may be necessary.
Users may want to fine-tune the color balance, shading, or texture to ensure that the fill integrates well with the original image. These adjustments can significantly impact the final quality of the output, so it is essential to refine the image as needed to meet your desired standards.
What are Some Tips for Using the AI-Powered Fill Tool?
The AI-Powered Fill Tool in Photoshop works best when high-quality images are used as a baseline, as AI depends on clear and detailed visuals to generate content that seamlessly blends with surrounding elements.
Furthermore, combining multiple tools and techniques fosters a more comprehensive approach to image editing, give the power toing users to be more creative in achieving their desired artistic effect.
1. Use High-Quality Images
When using the AI-Powered Fill Tool in Photoshop, it is essential to utilize high-quality images as your source material. The quality of the source image directly impacts the quality of the generated content. For the AI to effectively analyze the surrounding area and produce results that seamlessly blend with the image, it must be able to clearly discern the details in the original. Higher resolution and well-lit images provide the AI with more information to work with, resulting in more accurate and visually appealing outcomes.
When selecting images, prioritize those with sharp details and rich textures, as these characteristics significantly enhance the tool’s effectiveness. For instance, a bright landscape shot taken in natural light will yield far better results than a blurred or poorly lit photograph. Additionally, preparing images by adjusting exposure and contrast levels before use can further improve the AI’s performance.
It is also advisable to minimize distracting clutter in the background, as this will help photographers focus on simplicity in their compositions and provide the AI with a cleaner canvas to work with. This approach can lead to final edits that surpass expectations.
2. Use a Combination of Tools
Utilizing additional editing tools alongside the AI-Powered Fill Tool can significantly enhance the editing process by adding complementary functionality and improving the overall quality of results. Employing selection tools such as the Lasso tool or Rectangular Marquee in conjunction with the Fill Tool allows users to define areas for modification with greater precision. This integrated approach fosters creativity and enables the incorporation of various artistic techniques to achieve a more refined visual outcome.
For example, once a specific area is filled, adjustment layers can be applied to enhance brightness, contrast, or color balance, resulting in a much higher quality final image. Additionally, blending modes can have a substantial impact when applied to layers created from selections, allowing for textures or effects that align with the overall design theme.
Furthermore, using the Clone Stamp tool in conjunction with selections enables artists to effortlessly correct flaws while maintaining the integrity of the original image. The combination of multiple tools streamlines the workflow and introduces innovative possibilities into the editing process, culminating in visually striking compositions that reflect the user’s unique style.
3. Experiment with Different Settings
To fully explore the creative possibilities offered by Photoshop’s AI-Powered Fill Tool, it is essential to experiment with different settings. By adjusting parameters such as fill type, prompts, and blending options, users can explore a variety of artistic styles that yield innovative and creative results. This experimentation not only enhances the editing process but also fosters a deeper understanding of how AI can support and enhance an individual’s creative vision.
For instance, switching the fill type from content-aware to pattern-based can dramatically change the aesthetics of an image, introducing textures that evoke different feelings. Additionally, refining prompts can help steer the AI toward results that align more closely with the user’s artistic intent whether that involves a vibrant color palette to create a welcoming atmosphere or muted tones for a more intimate ambiance.
Moreover, manipulating blending options facilitates the seamless integration of modified elements, allowing users to achieve their desired look while encouraging further exploration.
Frequently Asked Questions
How do I use AI to fill in areas in Photoshop?
To use AI to fill in areas in Photoshop, first select the area you want to fill by using the lasso or marquee tool. Then, go to the Edit menu and select “Fill.” In the Fill dialog box, choose “Content-Aware” under the Use dropdown menu and click “OK.” This will use AI to analyze the surrounding pixels and fill in the selected area.
Can I customize the AI fill in Photoshop?
Yes, you can customize the AI fill in Photoshop by adjusting the settings in the Fill dialog box. You can choose to use the Content-Aware option or select specific patterns or colors to fill in the area. You can also adjust the opacity and blending mode of the fill for a more seamless result.
What are the benefits of using AI to fill in Photoshop?
Using AI to fill in Photoshop can save you time and effort in manually filling in areas with the clone stamp or healing brush. It also produces more realistic and seamless results, making it a great tool for professional photo editing.
Does AI fill work on all types of images in Photoshop?
AI fill in Photoshop works best on images with a clear and consistent background or texture. It may not work as well on images with complex backgrounds or multiple subjects. It’s always best to try it out and see if the results meet your expectations.
Can I undo the AI fill in Photoshop?
Yes, you can undo the AI fill in Photoshop by using the History panel or pressing Ctrl+Z on your keyboard. You can also use the eraser tool to manually remove any areas that were filled in by the AI fill.
Is there a way to improve the results of AI fill in Photoshop?
If you’re not satisfied with the results of AI fill in Photoshop, you can try adjusting the settings in the Fill dialog box or using other tools like the clone stamp or spot healing brush to refine the area. You can also try using different selection methods to get a more accurate fill.